The Tower - Idle Tower Defense Beginners Workshop Upgrades Guide
![]() Workshop is one of the core upgrade mechanics in The Tower - Idle Tower Defense mobile game. Main role of the workshop is to speed up the in the run upgrade process by buying those upgrades permanently using coins. It allows in the run upgrades to start at the higher initial level at the same price, which allows to reach higher values cheaper. Also, if you max out upgrade in the workshop it will not require any upgrades in game and that can be a good head start for some upgrades.
Workshop is one of the core upgrade mechanics in The Tower - Idle Tower Defense mobile game. Main role of the workshop is to speed up the in the run upgrade process by buying those upgrades permanently using coins. It allows in the run upgrades to start at the higher initial level at the same price, which allows to reach higher values cheaper. Also, if you max out upgrade in the workshop it will not require any upgrades in game and that can be a good head start for some upgrades.
This The Tower - Idle Tower Defense Workshop Upgrade Guide will help you to figure out the best upgrades to get at each game stage, explain how they work, list all the upgrades and showcase the upgrades priority. It's part of The Tower - Idle Tower Defense Guides series, where you can find the rest of the guides on the game.
We covered the basics of Workshop Upgrades in the The Tower Ultimate Beginners Guide, in this article we will go into the detail of each upgrade and will explain why the upgrade order matters and how to properly prioritize your Workshop Upgrades.
Attack Upgrades[edit source]
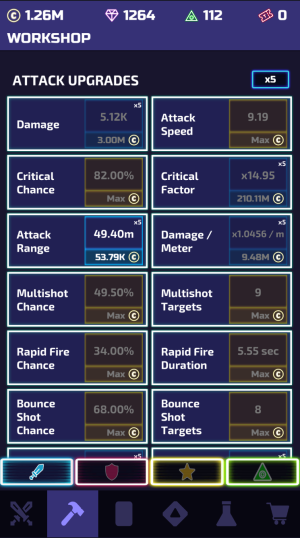
Workshop Attack Upgrades are focused on offensive Tower capabilities. Overall, for early game most of those upgrades are not so useful, since beginner builds rely on the Defense stats. With that said it's still a good idea to spend some extra Coins for cheap upgrades here, they will still help but won't be top priority for a while.
I would suggest evenly spending ![]() Coins for Attack Upgrades after you invested in other upgrades you wanted. This advice will work though most of the early game, during your fist 2 builds and Coin farming. Here is the upgrade order I would recommend for Workshop Attack Upgrades with some explanation:
Coins for Attack Upgrades after you invested in other upgrades you wanted. This advice will work though most of the early game, during your fist 2 builds and Coin farming. Here is the upgrade order I would recommend for Workshop Attack Upgrades with some explanation:
- Attack Speed - Atk Speed is one of the most important upgrades in the game, since every time you hit an enemy, they are being knocked back and game calculates other effects that can be triggered. Attack Speed just makes more of those events / chances per second, so it's a must.
- Multishot Chance - Early on it's not that important but for the longer runs it helps a lot when dealing with multiple enemies in the tower range as well as attacking other enemies when Boss is getting close or in melee range of the Tower.
- Multishot Targets - It can be expensive, but getting couple of upgrades here will help to make Multishot Chance actually work. Once you reach around 5 targets it's low priority afterwards
- Bounce Shot Chance - Another important upgrade to attack more enemies. It should be leveled along with Multishot. It's really nice, because it allows to hit enemies outside of the Tower's range. Getting the chance higher is a great option to tackle enemies far away and push them around with Knockback.
- Bounce Shot Targets - Will allow projectile to bounce more if the chance triggered. More enemies hit - more fun.
- Bounce Shot Range - Will allow projectile to bounce to enemies that are further away, making hitting enemies out of range easier and Bounce Shot more effective.
- Rapid Fire Chance - Chance to increase Attack speed x4 for the duration. Really useful. Getting to 20% is good enough, considering high attack speed values.
- Rapid Fire Duration - How long Rapid Fire will last. Getting some points here is a good idea, but afterwards it's low priority, since even with a shorter duration Rapid Fire triggers really easily.
- Critical Chance - Chance to score a Critical Hit. Most of the time it's not the top priority, but if you use a Card that gives Coins for each Critical Hit - It's a must, since it will increase Coin income drastically. If it's leveled for the damage, just level evenly with other damage upgrades.
- Damage - It's the base for damage calculation and for many damaging skills. Even though it might feel important it is not for the early game. You mostly use damage to Lifedrain and heal, but it should be kept up to date with the leftover coins you have. Low priority, but do not abandon it.
- Critical Factor - It's the Critical Hit Damage Multiplier. It's good to have for damage and a nice investment for leftover Coins since in game Cas upgrade cost can get really high.
- Damage/Meter - Good upgrade for extra damage. It scales with range to the enemy and works well with Bounce Shots and Range upgrades. Not a top priority, but it can be very useful against Ranged enemies.
- Super Crit Chance - Chance to trigger Super Crit if normal Critical is triggered. Can contribute a lot to the damage, but requires a Crit Chance to be maxed and costs a lot. Don't prioritize it early game, those coins are better spent elsewhere.
- Super Crit Mult - Damage Multiplies for the Super Crit. It will multiply the Critical Damage. Once again not for the early game, because it gets really expensive really fast.
- Attack Range - Not a top priority for most builds, Range won't help you so much, but it will be eventually maxed during the runs using free upgrades, so you might want to put it as the LAST upgrade to spend coins on.
- Rend Armor Chance - Provides chance on enemy hit to permanently increase projectile damage on that enemy. Ranges from 0.1% to 30%. Since it costs 500 Billion Coins to unlock Rend Armor, it's the last thing to upgrade and by the time you will unlock it you should know what to do.
- Rend Armor Mult - Increases the amount of additional Damage enemy takes on Rend Armor Chance proc. Ranges from 0.1% to 30%. Effective only for the projectiles, so useless for the Defense based builds.
With the priority list ready you should remember that during the free upgrades will randomly upgrade one of the stats. You can use it to your advantage to upgrade really expensive things like Super Crit or Damage, because their Cash price can go really high really fast. In order to maximize the chance of the rights upgrades being auto upgraded you need to max out other upgrades, and it's pretty easy to do for Attack Upgrades. Because of that there might be a reason to invest on the things you do not need but have the ability to easily max them in the Workshop or in the run fast enough to utilize free upgrades for more important things.
Defense Upgrades[edit source]
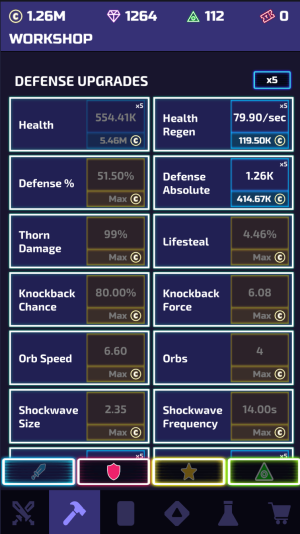
Defense Workshop upgrades are essential for early game progression builds like Turtle Build and Blender Build that are based on the defense and Thorns. Overall, outside of Coin upgrades they should be top priority in the Workshop.
Recommendations here will be different, depending on the build you are using. For Turtle build, Defense Absolute is the best, for Blender Build you need HP and Def %. I will follow Blender and post blender upgrade priorities, since that game phase take the longest and covers most of the Workshop upgrades to the max. In any case prioritize the things that you need right now and feel that they will help to progress and make sure to spend some coins for the rest of the upgrades too:
- Defense % - One of the best Defense upgrades you can get; it will effectively increase your HP pool by lowering the damage enemies do to you. Try to get it high to be able to max it during the run.
- Knockback Chance - It will allow your projectiles to push the enemies away and prevent you from taking damage. Higher Knockback Chance together with Attack Speed, and multi enemies attack will allow most enemies to never get too close to your Tower.
- Knockback Force - Nice addition to Knockback chance that will make it even better. Don't push it too hard, since in the run upgrades are really cheap
- Health - Health upgrade have insane cap, so upgrading the workshop will allow you to get higher health values in the run for the same Cash investment. That will allow you to push for higher waves, tiers and farm stuff easier. Don't ignore it and keep upgrading from time to time.
- Orb Speed - Higher orb speed will allow you to take out more enemies with orbs easier, so it's a must for a Blender Build. Although it can be upgraded naturally in the run, so no point rushing it.
- Orbs - More Orbs - more enemies can be killed with them. Getting 2-3 is enough, last upgrade is cheap in the run.
- Thorn Damage - It will help to kill bosses, ranged enemies and whoever managed to the Tower faster. Not a top priority, but it will help greatly, especially in the later Waves where enemies can one-two shot you. Make sure that you have enough Workshop upgrades to level up your thorns to the maximum by the time things get tough.Your goal should be to get at least 51% thorns.
- Lifesteal - It's your main way of healing, so make sure to have some points here. Don't go too hard on it, since it can get very expensive and you need your Coins for other workshop upgrades.
- Shockwave Size - It will push the enemies away, but usually Knockback does all the work. Not that useful, but it's still knockback, extra coins can help and it's relatively cheap. Very low priority
- Shockwave Frequency - Even fully upgraded it have 14s cooldown, so it doesn't help that much, but it's cheap, so why not. Very low priority
- Death Defy - Chance to survive a deadly hit. Very expensive and unreliable, so I would advise against getting it at all. If you haven't unlocked it, don't rush. The only good use for it is during the Event missions.
- Land Mine Upgrades - Chance is a chance to create mine on an enemy kill, damage and radius are self-explanatory. Overall for early-mid game they are useless. When you start the run enemies can be easily killed with normal projectiles, later on they are too strong to be killed by mines. Best use for them are evet tasks. Do not recommend upgrading in the workshop unless the price is really low for you.
- Defense Absolute - It used to be great upgrade early game, but it doesn't scale well. Very soon enemy attack becomes so high, that even heavy investment in Defense Absolute will shave off below 1% of the enemy damage. Doesn't worth the Coins past Turtle build.
- Health Regen - Another stat that doesn't scale and work well at the early game stages. With 7m health pool 500 health/sec regen is useless. Do not recommend investing in it.
- Wall Health - Wall will add additional defensive barrier which will tank the enemy damage. When it's Health reaches 0, it will rebuild. Wall health will increase the Wall Health, starting from 20% and all the way to 200% of your Tower Health. Those upgrades are very expensive, so should be unlocked and upgraded in the Workshop after everything else is in a good shape. They also can harm your progress by blocking the enemies for a while and then breaking down, which allows enemy to group up and attack the tower together.
- Wall Rebuild - Time needed to rebuild the Wall when it's destroyed. Very long cooldown, fully upgraded it will be 600 seconds.
For the Free upgrade efficiency, you can max out most of the things, but Defense Absolute and Health Regen will still be there and will share the chance of free upgrade with Health. Still 33% chance for a free health upgrade, better than nothing and it gets pretty expensive later on.
Utility Upgrades[edit source]
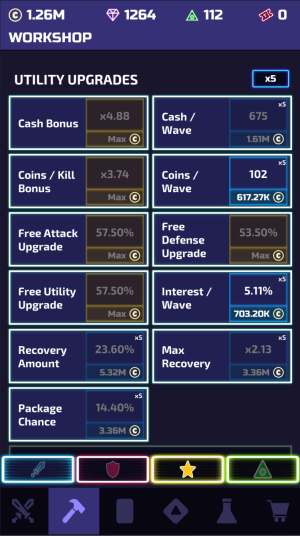
While Workshop Utility Upgrades do not contribute to your Tower combat capabilities directly, they are extremely important for the progression both long term and in the run. It's a great idea to invest heavily in most upgrades here. Try to focus on getting the Coin upgrades here as a top priority, balancing your spending with Defense Upgrades for in stage progression.
Recommended Workshop Utility Upgrade order:
- Coins/Kill Bonus - It's one of the most important upgrades in the whole Workshop, since it increases your Coin farming speed, which means you will progress faster. Getting it as high as possible will help to start earning Coins during your runs earlier and faster.
- Cash/Wave - Important for progression in the very start of the runs. Since enemies don't drop a lot of Cash early on, this upgrade will allow you to build up some Cash for Interest to kick in. Just don't spend Cash when you start your run unless you need to.
- Cash Bonus - Cash earned multiplier (including the Wave bonus). Will allow you to get more Cash for the middle-late game upgrades. That will allow you to push further, farm Coins longer and increase Coins/minute as well as unlock new Tiers.
- Free Utility Upgrade - Amazing upgrade that will allow you to get free automatic upgrades for Utility in the run. Can be used to either save up some Cash during the run, or get higher values of Max Recovery and other expensive upgrades for later longer runs
- Free Defense Upgrade - Can be convenient early game to get some free upgrades, but shines in the longer runs, providing extra Health upgrades free of charge.
- Free Attack Upgrade - Same as Defense Free Upgrade, really good for longer runs. It will provide expensive upgrades like Super Crit for free and when everything is upgraded it will add to the Damage upgrades.
- Interest/Wave - It will make you earn interest and reach max interest faster. Pretty good to put some extra coins here for lower cash required for max interest, and will be really useful with some Max Interest Lab upgrades.
- Max Recovery - Max recovery should be prioritized over other recovery upgrades, since it doesn't have a cap, and it will contribute to the higher extra health value, making you tougher to kill.
- Package Chance - Chance that Recovery Package will spawn at the start of the Wave. Should be high, so you can afford to max it out in the run for longer runs.
- Recovery Amount - % of your Tower's Health that will be recovered, spending some Coins here will help, but it can be maxed during the run.
- Coins/Wave - Might be good early on, but it seems inefficient for long term coin farming. It will not contribute that much towards your Coin gains, but investing extra
- Enemy Level Skip - is a pretty useful upgrade straight after unlock even without any upgrades in the Workshop. Can be leveled during the runs with the use of Free Upgrades and will make enemies scaling a bit easier.
Coins for its Workshop Upgrade will help to max it in the run faster, which allows Free Utility Upgrade to work on the good stats.
Since most Utility Upgrades in the Workshop are pretty much a must, Free Utility Upgrade will have an easy time finishing what you couldn't and then focus on Max Recovery.
Workshop Upgrades Video Guide[edit source]
This video showcases best Workshop Upgrade practices and gives some tips on how to build your workshop.
| The Tower Wiki navigation | |
|---|---|
| Main Tabs | |
| Game Mechanics | Milestones • Enemies • |
| Useful Pages | Builds • Full List of Game Mechanics • How to Play on PC |
| Guides | All Guides • Ultimate Beginners Guide • Cards Tier List and Guide • Gem Guide • GT, BW, DW Sync Guide • Reroll Guide |
